The ones that did still went wrong more often than we expected. Almost never during the 7 steps of hand hygiene themselves, either. The trouble usually started before step 1.
What we saw at our own sink and out in the world:
Kids running through every step of the routine with a ring or a hair tie still on
Parents reaching for sanitizer on visibly dirty hands, the one situation where the CDC says it may not work as well (we came close to doing it ourselves on a Connecticut trail with hungry kids and no water source)
Soap pumped onto dry palms and rinsed off before it ever lathered
Sleeves soaked at the cuff, then pulled right back down over clean wrists
We're Dr. Ruslan Maidans (PhD, Biomedical Engineering) and Dr. Yalda Shahriari (DDS). We founded NOWATA after two years of formulation work and Swiss lab testing, and we're parents first, which is how we ended up studying hand hygiene at playgrounds and trailheads instead of only in a lab.
Our full guide to the 5 moments and 7 steps of proper hand hygiene covers when to clean your hands and how. The setup gets a sentence or two there. It deserves more, because that's where we've watched good technique fall apart most often.
TL;DR Quick Answers
7 Steps of Hand Hygiene
The 7 steps of hand hygiene are a set sequence for cleaning every surface of your hands, based on the World Health Organization's technique: palms, backs of hands, between the fingers, backs of the fingers, thumbs, fingertips and nails, and wrists. As doctors and parents, we add step 0, which is preparing your hands before step 1.
The 7 steps:
Palms: rub palm to palm
Backs of hands: right palm over the back of the left hand with fingers interlaced, then switch
Between fingers: palm to palm with fingers interlaced
Backs of fingers: curl your fingers into the opposite palm, interlocked
Thumbs: clasp each thumb in the opposite hand and rotate
Fingertips and nails: rub in circles against the opposite palm
Wrists: rotate each wrist in the opposite hand
Step 0, before you start:
Visibly dirty or greasy hands need soap and water, not sanitizer (CDC)
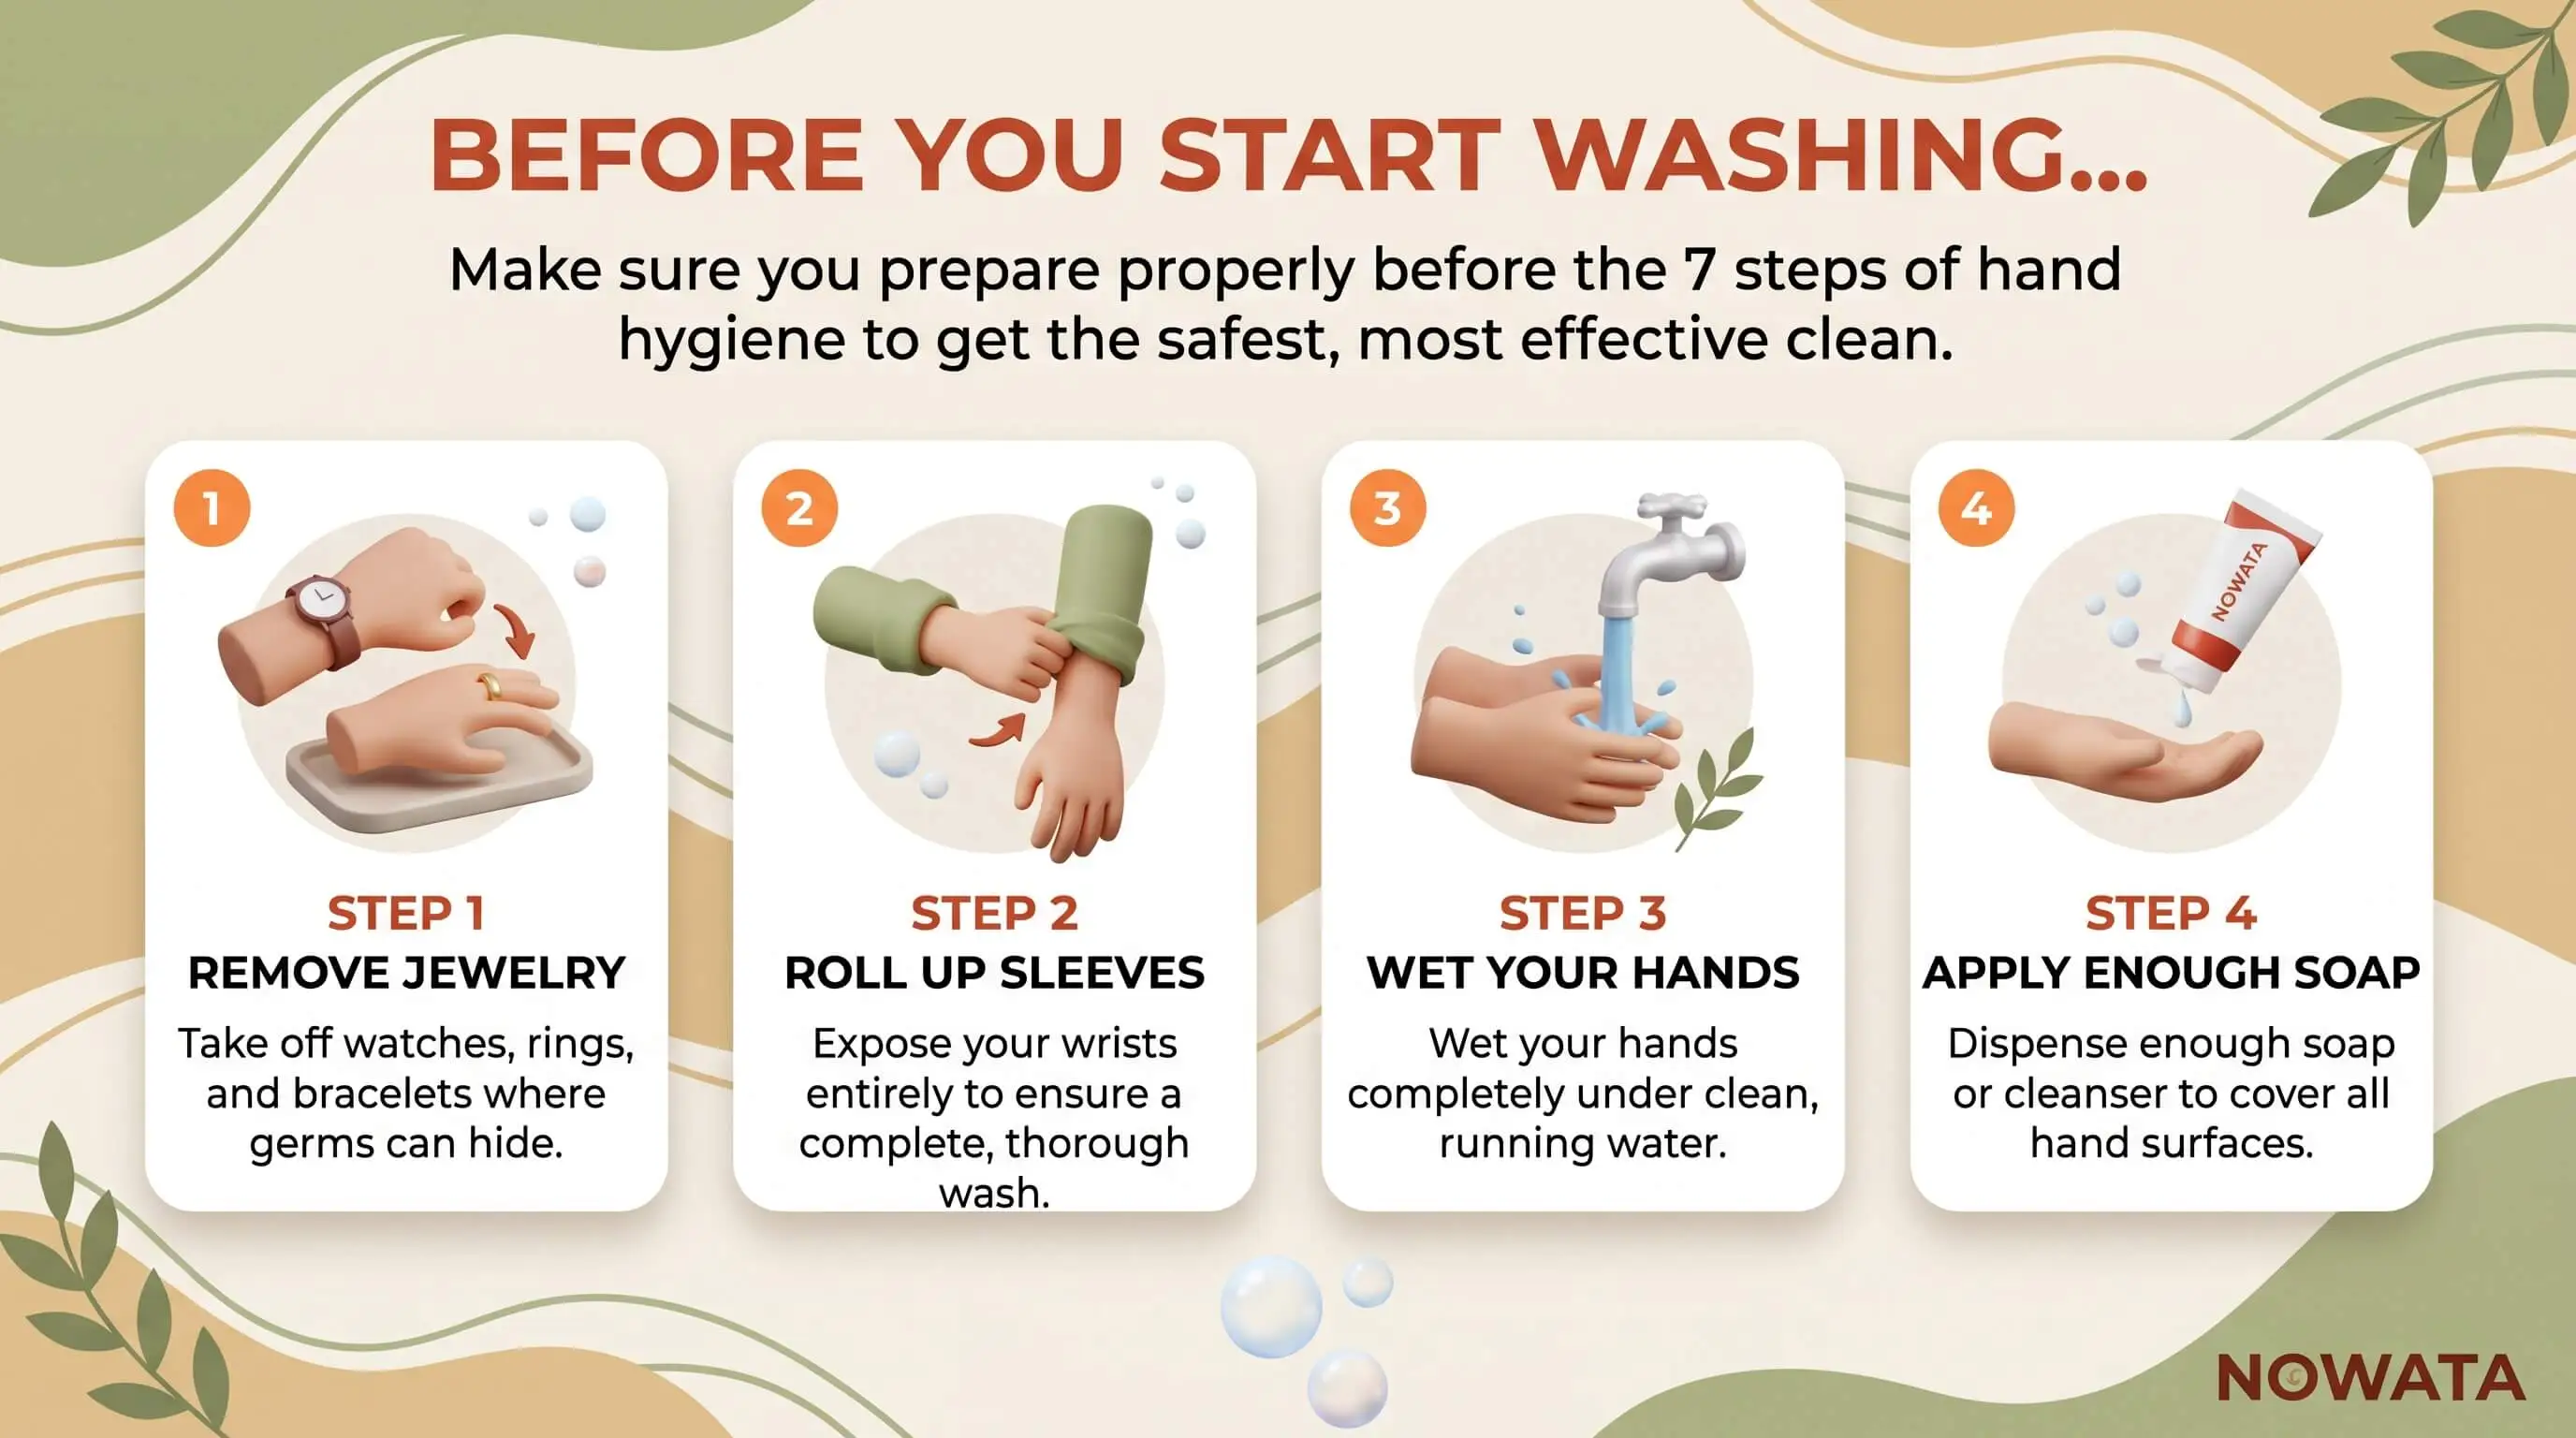
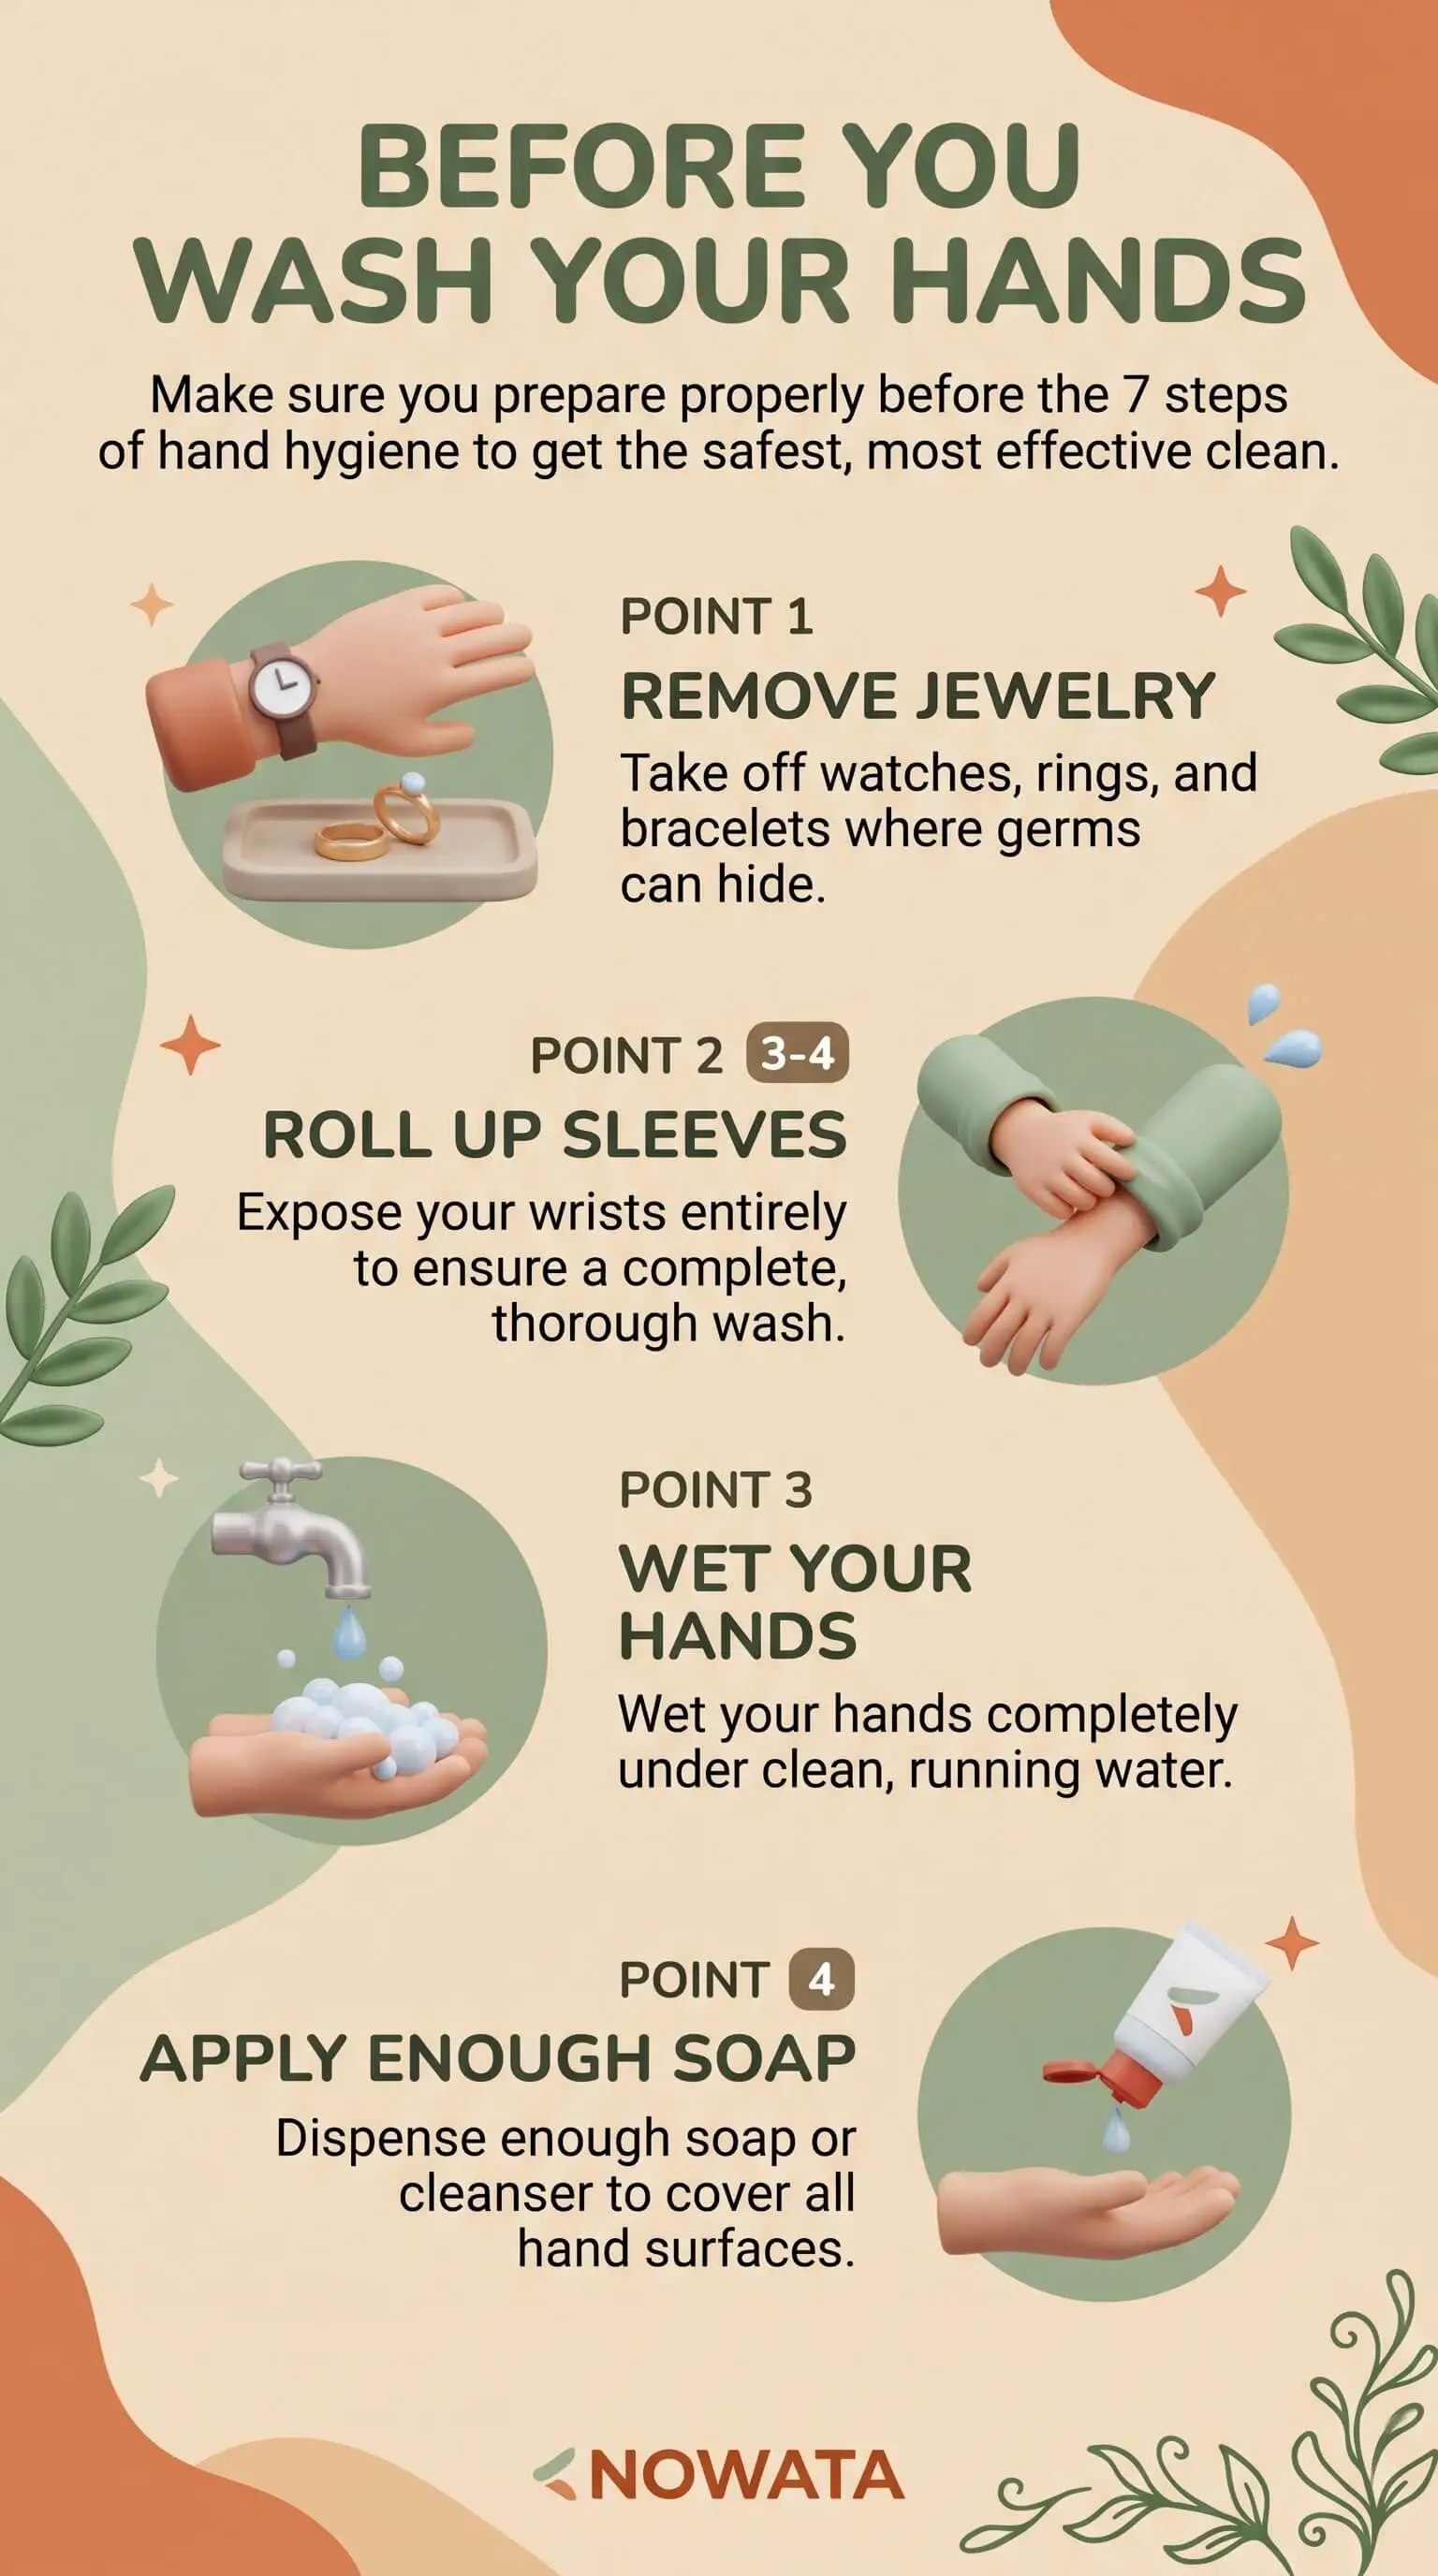
Take off rings and watches, and push sleeves above your wrists
At the sink, wet your hands before applying soap for a better lather
How long: scrub for at least 20 seconds (CDC). A full handwash takes 40 to 60 seconds, and a hand rub takes 20 to 30 (WHO).
No sink? Work through the same 7 steps on dry hands with a waterless soap like NOWATA, rubbing until it clumps, then brushing it off.*
Top Takeaways
Preparation belongs inside the procedure.
The WHO's handwash chart starts at step 0, wetting your hands
We treat those first few seconds as the base the 7 steps of hand hygiene sit on
Look at your hands before you choose a method.
Visibly dirty or greasy hands need soap and water
The CDC says sanitizer may not work as well on dirty hands, and it names gardening and camping as examples
Better technique later can't fix the wrong tool at the start
Jewelry, sleeves, nails, and cuts come first.
Rings and watches block friction on skin the steps are meant to reach
Short, clean nails and covered cuts protect the hardest areas to clean
Sleeves pushed above the wrists keep the last step from getting skipped
Jewelry goes back on only after your hands are completely dry
At the sink, wet first. With waterless products, stay dry.
The CDC says wetting before soap creates a better lather
Warm or cold water removes the same number of germs
Preparation works without a sink, too.
Knock off loose dirt and dry your hands, then work through all 7 steps
We built NOWATA for exactly these moments, and in lab testing it physically removed over 99.9% of tested germs*
Why Preparation Decides Whether the 7 Steps of Hand Hygiene Work
Proper hand washing depends on friction and coverage. Anything that blocks either one before you start puts a ceiling on how clean your hands can get, however carefully you scrub.
What gets in the way before step 1:
A ring or watch covers skin the steps are designed to reach
Long or artificial nails hold dirt in a space a palm rub can't clean, and the CDC notes that microbes concentrate under the nails
An open cut can pick up contamination and get more irritated with every wash
Visibly dirty hands turn hand sanitizer into the wrong tool before you've even started
Scrubbing harder won't fix a ring you forgot to take off. In our experience, technique fails on preparation far more often than on effort.
The Pre-Wash Checklist: 7 Things to Do Before You Start
None of these checks takes more than a few seconds. Skip one, though, and the 7 steps have to work around it.
1. Choose your method: soap and water or a hand rub
Look at your hands first. If they're visibly dirty or greasy, you need soap and water. The CDC's hand sanitizer guidance is specific here, naming gardening, outdoor play, fishing, and camping as times to skip sanitizer and wash instead.
What we found: most people grab whatever's closest. A glance at your palms decides whether the next 20 seconds actually do anything.
2. Take off rings, watches, and bracelets
Nursing checklists put jewelry removal first for good reason. Rings and watches block friction and hold moisture against the skin. Set yours somewhere clean and dry, and the wet edge of the sink doesn't count.
3. Push sleeves above your wrists
Many clinical checklists, including the WisTech Open nursing skills checklist, finish on the wrists. A wet cuff gets in the way of that last motion, then sits damp against clean skin afterward.
4. Check your nails
Short and clean is the goal. The WHO's hand hygiene brochure advises against artificial nails or extenders for anyone in direct patient care. At home, one look under your nails tells you whether the fingertip step needs extra time.
5. Cover cuts and broken skin
Put a waterproof bandage on before you wash. It keeps the cut protected while you scrub and spares it from getting more irritated wash after wash.
6. Set up the sink before you touch anything
Get a clean towel or paper towel within reach first. Water temperature is your call, since the CDC says warm and cold water remove the same number of germs and warmer water can be harder on skin. Aim for a steady stream that doesn't splash.
7. Wet hands first, then use enough soap to cover every surface
According to the CDC, wetting your hands before soap gives you a better lather than soap on dry skin. Use enough to reach your palms, the backs of your hands, your fingers, and your wrists. A hand rub or waterless soap flips the rule and goes on dry hands.
A Quick Refresher: The 7 Steps of Hand Hygiene
Once you're prepared, the 7 steps of hand hygiene take over. Give each surface several strokes:
Palm to palm
Right palm over the back of the left hand with fingers interlaced, then switch
Palm to palm with fingers interlaced
Backs of the fingers against the opposite palm, fingers interlocked
Each thumb, clasped and rotated in the opposite palm
Fingertips and nails, rubbed in circles against the opposite palm
Each wrist, rotated in the opposite hand
The numbering trips people up because sources don't agree on it. The WHO's chart ends on the fingertips, many hospital and nursing checklists add the wrists as a seventh motion, and our own full guide counts applying soap as step 1. Do all seven motions and the numbering stops mattering.
The WHO times the full handwash, wetting through drying, at 40 to 60 seconds. For the scrub alone, the CDC's minimum is 20.
How to Prepare When There Is No Sink
Without water, the checklist barely changes. Jewelry comes off and sleeves go up, and a cut still gets its bandage. Two things are different.
What changes without a sink:
Knock loose dirt off first. After a weekend of laying pavers or stone (here's a primer on hardscaping types and materials), brush the caked soil off your palms before you apply anything
Start with dry hands. Waterless products are made for dry skin, so wipe away sweat or moisture first
How we use NOWATA when there's no sink:
Apply a small amount to dry hands
Rub through all 7 steps until the formula starts to clump
Brush the clumps off, and the dirt and oil go with them
In lab testing, NOWATA physically removed over 99.9% of tested virus and bacteria particles from skin.* We keep a tube in the car console, the hiking pack, the kids' backpacks, and by the front door. We also wrote about picking a waterless soap for camping when there is no shower.
Preparation Mistakes That Undo the 7 Steps
We see these constantly, at home and out in the world:
Washing with a ring on
Sanitizer on hands that are visibly dirty or greasy
Soap pumped onto dry hands at the sink, where it lathers poorly
Long sleeves that soak through and get pulled back over clean hands
A scrub that covers the palms and never reaches the thumbs, fingertips, or wrists
A few seconds under the tap when the CDC's minimum is 20
How to Prepare Children's Hands
Kids need the same preparation with a little more help. Here's how we handle it with ours:
Rings, bracelets, and hair ties go in a pocket
Sleeves get pushed up past the wrists
A step stool lets them reach the water without leaning on the sink
One cue covers the whole routine: rub like you're putting on invisible gloves
For kids with reactive skin, the soap matters as much as the prep. We covered what to look for in a gentle hand wash for school-age children with allergies.
"While we were formulating NOWATA, we spent a lot of time watching how people actually clean their hands, and not in a lab. We watched at playgrounds, at trailheads, in Dr. Yalda's dental practice, and at our own kitchen sink with our kids. Technique rarely broke down on its own. What failed first was the setup: a ring left on, sanitizer rubbed into muddy palms, soap rinsed away before it ever lathered. As a biomedical engineer and a dentist, we think of hand hygiene as a system, and preparation is the first part of that system. Get those first few seconds right and the 7 steps do what they were designed to do. Skip them, and scrubbing harder won't make up the difference."
7 Essential Resources
When someone asks us what they should do before they start washing, these are the pages we point them to. Each one answers a different preparation question.
1. The Chart That Puts Preparation Inside the Procedure
Source: World Health Organization, "Hand Hygiene: Why, How & When?" brochure
Most people never notice that the WHO's illustrated handwash chart starts at step 0, wetting your hands. The same brochure explains when to pick soap over a hand rub and spells out the nail rules for patient care. We'd print the chart and tape it by the sink.
2. The Plain-Language Version for Families
Source: Centers for Disease Control and Prevention, "About Handwashing"
Wet, lather, scrub, rinse, and dry, plus the key times to wash, written for everyday life instead of a hospital ward. When a parent asks us for the short version, this is the page we send.
Source: https://www.cdc.gov/clean-hands/about/index.html
3. When Sanitizer Is the Wrong First Move
Source: Centers for Disease Control and Prevention, "Hand Sanitizer Guidelines and Recommendations"
This page settles the first item on our checklist. Sanitizer may not work as well on visibly dirty or greasy hands, and the CDC names gardening, outdoor play, fishing, and camping as moments to wash instead. If your weekends involve the yard, read it.
Source: https://www.cdc.gov/clean-hands/about/hand-sanitizer.html
4. Answers to the Questions You Have at the Sink
Source: Centers for Disease Control and Prevention, "Hand Hygiene Frequently Asked Questions"
Warm or cold water? Wet first or soap first? Paper towel or air dryer? The CDC answers each one in a short paragraph, and it's where we got our answer on water temperature, which is that it's your choice.
Source: https://www.cdc.gov/clean-hands/faq/index.html
5. How Nurses Are Trained to Prepare
Source: WisTech Open, Nursing Skills 2e, "Checklist for Hand Hygiene With Soap and Water"
Nurses learn to prepare in a set order: jewelry off, sleeves above the wrists, water adjusted, hands kept below the elbows. Home life doesn't need that much formality. We still find it useful because it shows how seriously clinicians treat the seconds before step 1.
6. The Evidence Behind the Recommendations
Source: World Health Organization, "WHO Guidelines on Hand Hygiene in Health Care" (2009)
This is 270 pages of the evidence behind modern hand hygiene, and we kept coming back to it while developing NOWATA. It isn't light reading. It's where to go when you want the reasoning behind each rule.
Source: https://www.who.int/publications/i/item/9789241597906
7. Free Materials for Teachers and Community Programs
Source: The Global Handwashing Partnership, Resource Library
You'll find research summaries, fact sheets, and a technical guide to building handwashing facilities in public places. If you're teaching preparation to a classroom that shares one sink, start here.
Source: https://globalhandwashing.org/resources/
These seven trusted resources from the WHO, CDC, nursing education guidelines, and Global Handwashing Partnership explain how to prepare for proper handwashing, including when to use soap instead of sanitizer, how to remove jewelry, and why water temperature and technique matter. Whether you're washing at home, teaching children, or following healthcare hygiene practices, using natural non toxic hand soap as part of a consistent routine can help make proper hand hygiene a simple everyday habit.
3 Statistics
We went looking for data on preparation specifically and found almost none. These three numbers came closest, and each one shifted how we teach the seconds before step 1.
1. 62% of U.S. Adults Know the 20-Second Rule, Yet 48% Still Skip Washing at Key Times
The National Foundation for Infectious Diseases' 2025 State of Handwashing Report surveyed 3,587 U.S. adults through NORC at the University of Chicago. Most respondents, 62%, knew that 20 seconds of soap and water cuts the spread of germs. Even so, 48% admitted forgetting or choosing not to wash at key times, and 1 in 5 skipped it on purpose, citing reasons like lack of time or drying out their hands.
What we take from it:
People already know the rule, so the gap is follow-through
A routine that feels slow gets skipped, which is why preparation has to become automatic rather than one more thing to remember
Source: National Foundation for Infectious Diseases, 2025 State of Handwashing Report
2. Teaching Handwashing Cuts Stomach-Illness School Absences by 29% to 57%
The CDC reports that handwashing education in the community reduces diarrheal illness by 23% to 40% and respiratory illnesses like colds by 16% to 21%. Among schoolchildren, it cuts absences from gastrointestinal illness by 29% to 57%.
What we take from it:
Those gains come from teaching, so habits like rings off and sleeves up are worth teaching right alongside the steps
With our own kids, a full routine stuck faster than a list of separate rules, so we teach preparation and the 7 steps as one sequence
That 57% upper bound is the number we think about when we picture a classroom sharing one sink
Source: Centers for Disease Control and Prevention, Handwashing Facts
Source: https://www.cdc.gov/clean-hands/data-research/facts-stats/index.html
3. A Full Handwash Takes 40 to 60 Seconds and a Hand Rub Takes 20 to 30
The WHO's hand hygiene brochure times the full handwash procedure at 40 to 60 seconds and an alcohol-based hand rub at 20 to 30 seconds. It also directs soap and water, not a rub, whenever hands are visibly dirty.
What we take from it:
Picking the right method at the start changes how long the whole routine takes
The WHO's clock starts when you wet your hands, so the checks before that are the one part of the routine nobody times. We think that's a big reason they get skipped.
Source: World Health Organization, "Hand Hygiene: Why, How & When?"
Final Thoughts and Opinion
After two years of formulation, lab testing, and washing up alongside our own kids, here's where we've landed: the 7 steps of hand hygiene are only as good as the few seconds before them.
What we think the guidance gets wrong
Every major source teaches the motions, and very few spend much time on the setup. Clinical checklists tuck preparation into nursing manuals, while the posters in public restrooms mostly leave it out. So families learn to scrub thumbs and fingertips while a ring, a wet cuff, or sanitizer on muddy hands quietly undoes the work.
What we'd change:
Teach preparation as step 0, the way the WHO's own handwash chart already numbers it
Make "look at your hands first" the first rule kids learn, so soap and water becomes the automatic choice for visibly dirty hands
Stop treating jewelry, nails, and cuts as healthcare-only concerns, because they matter at the kitchen sink too
Time the whole routine, setup included, instead of just the scrub
Where we stand on the no-sink problem
Preparation shouldn't depend on plumbing. On a trail, at a ballfield, or in the back seat after school pickup, the same checks apply. That gap is the reason NOWATA exists, because sanitizer was never meant for dirty hands and regular soap was never meant to work without water.
The bottom line
Better hand hygiene starts before the soap does, so take those few seconds every time. When there's a sink, use it. When there isn't, prepare the same way and reach for something built for that moment.
Frequently Asked Questions
Q: Do you have to remove rings before the 7 steps of hand hygiene?
A: Yes. Take off rings, watches, and bracelets before you start. Clinical hand hygiene checklists put jewelry removal first because jewelry blocks friction and covers skin the 7 steps are meant to clean. At home, set it somewhere clean and dry rather than on the wet edge of the sink, and put it back on once your hands are completely dry.
Q: Should you wet your hands before applying soap?
A: Yes, if you're using soap and water. According to the CDC, wetting your hands with clean water first gives you a better lather than putting soap on dry skin, and the lather is what traps and lifts germs and dirt. Warm or cold is fine, since the CDC says both remove the same number of germs. Hand rubs and waterless soaps are the exception. Those go on dry hands.
Q: Do you need to prepare differently for hand sanitizer?
A: Mostly no, with one important check. Jewelry still comes off and sleeves still go up, but look at your hands first. The CDC advises against sanitizer on hands that are visibly dirty or greasy, so wash with soap and water if yours are. Otherwise, use enough sanitizer to cover every surface and rub through the 7 steps until your hands are dry, which takes about 20 seconds.
Q: What should you do first if your hands are visibly dirty?
A: Head for soap and water. The WHO and the CDC both say soap and water is the right choice when hands are visibly soiled. If you've just come in from the garden or the yard, knock off loose soil before you reach the sink so you don't smear it across the faucet. Then wet your hands, apply soap, and spend extra time on the fingertips and nails.
Q: How do you prepare for hand hygiene when there's no water?
A: Run the same checklist without the sink. Take off jewelry, push your sleeves up, cover any cuts, brush away loose dirt, and make sure your hands are dry. Then use a product made for waterless cleaning. With NOWATA, we apply a small amount, rub through all 7 steps until it clumps, and brush the clumps away. In lab testing, it physically removed over 99.9% of tested germs.*
Clean Hands Start Before Step 1
Whether you're at the kitchen sink or a trailhead, the seconds before the first rub decide how well the rest works.
For the times when there's no water, try NOWATA, the doctor-made, plant-based soap that cleans with or without a sink.


